28. July 2013 · 1 comment · Categories: QlikView · Tags: , ,

Q-Eye is a third-party QlikView data file editor built by DB Software Laboratory.  It’s an interesting product that allows a QlikView designer or developer to view or edit the QVD and QVX files that are produced during the QlikView development and build process.

DB made a bleg for someone to test the 64-bit version and produce some memory consumption statistics.  I downloaded the software and tested it and also reviewed it for my own use.

Summary

Q-Eye definitely has a place in the toolbox of every QlikView developer and designer.  In my development lifecycle, I use it to:

  • Inspect the contents of QVD files that I am about to use.
  • During the execution of a load script, I store the contents of intermediate memory tables into QVDs and can then inspect them using Q-Eye.  This is very helpful for troubleshooting and debugging.

You should download it while it is still free!

Room for improvement

Q-Eye certainly has a few rough edges and I understand that the development team is looking for feedback for improvement.  Here is mine:

Enhancements requested

1) Q-Eye is slow at opening very large files (see the Performance Statistics below).  It needs to become faster.

2) Need to be able to drag and drop QVD files from Windows Explorer into the Q-Eye window.

3) Windows Explorer’s right-click Open With shortcut needs to have Q-Eye registered as a target for QVD files.

4) When you first open a QVD with Q-Eye, it loads only the first thousand rows.  This is not intuitively done, particularly for a new user, who eventually figures out that he must click on the Load All button.  It would nice to make this more obvious somehow, perhaps with a popup that appears over the Load All button once the initial load is complete.

5) The user needs the ability to tell Q-Eye that certain columns are dates or timestamps. Otherwise, they display the raw number.  Even better would be to examine the content and if it is a floating point number in the date range, display it as a date.

6) The search feature should have the option to search for Null values in a field, as well as any non-Null value.

7) Like most Windows apps, double-clicking on the border of a column should auto-size it.

8) When loading very large files, the progress bar shows the % complete as white letters on a light green background which is hard to see.

Bug fixes requested

1) After a file is open in a tab, Clicking on the Close X button for a tab does not close it. It seems to close only tabs without files in them. I had to exit Q-Eye altogether to close an open QVD

2) The auto format Grid feature greatly oversizes text fields. It looks like it is not actually sampling the content.

3) The menu item Help > Contactl Support has a typo (Contactl)

Performance Statistics

Version tested: Q-Eye 3.1.0.0 64-bit

Environment: MacBook Pro booted into Windows 7. This laptop is a high performance system with 4 cores and 16 GB of RAM with an internal flash drive.

Since a picture is worth a thousand words, here are charts of the QVD Load time and Memory Consumption for Q-Eye and QlikView vs. the QVD file size.

Q-Eye Review QVD Load Time


Q-Eye Review Memory Consumption


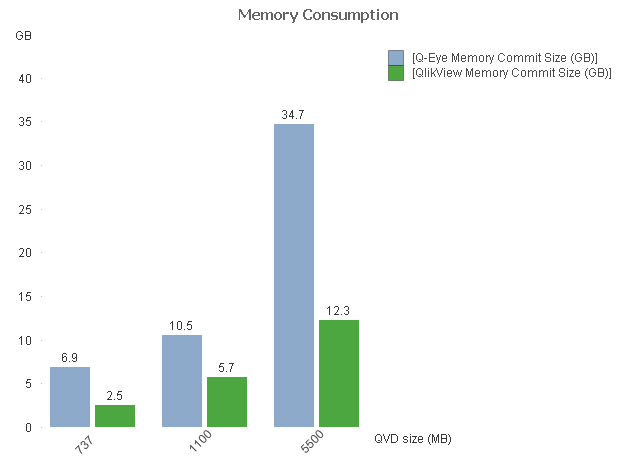
As you can see, the load speed and memory consumption of Q-Eye got progressively worse as the file size increased.  However, Q-Eye still loaded even the largest file fully and was able to display its contents.

Conclusion:  Q-Eye is definitely useful for inspecting small QVD files and is still usable for opening very large QVD files.

The raw statistics are here:

Test QVD size (MB) Rows (M) Columns Q-Eye Load Time (mins:secs) Memory Commit Size (GB) QlikView load time (mins:secs) Memory Commit Size (GB)
1 737 30.6 7 16:27 6.9 0:21 2.5
2 1100 49.7 9 26:47 10.5 0:33 5.7
3 5500 40.6 53 36:31 34.7 1:34 12.3


If you’re interested in visualization, check out this very cool TED talk by Hans Rosling, accompanied by interesting visualizations.

The software being used is called Trendalyzer.  Wikipedia summarizes its principal features well:

The information visualization technique used by Trendalyzer is an interactive bubble chart. By default it shows five variables: Two numeric variables on the X and Y axes, bubble size and colour, and a time variable that may be manipulated with a slider. The software uses brushing and linking techniques for displaying the numeric value of a highlighted country.

Trendalyzer appears to not be available for general purpose use.  It seems to be bundled along with world health, mortality and other developmental index data.  It would be interesting to see its time dimension features incorporated into other BI visualization products like QlikView or Tableau.

I started a Blogspot blog several years ago and contributed a few posts to it off and on over the years.

Then I revamped this web site using WordPress and wondered if I could import those few posts into this blog.

After enough Googling and experimentation, I can recommend the plugin SEO Blogger to WordPress using 301 Redirection.  It did a very clean job and I was able to pull over my blog posts, categories and even the comments.

This is a forum post that I made on the TrueCrypt forums.

I wanted to mount a TrueCrypt volume as a Windows NTFS folder using an NTFS mount point. I spent a lot of time figuring out how to do this, so here are the instructions for anyone else who wants to do this.

This is tested on Windows Vista. Use on other versions at your own risk.

Goal: Mount a TrueCrypt volume as an NTFS folder, e.g. C:\Users\MyName\MyEncryptedFolder

1) Create a TrueCrypt volume as documented in the manual. I believe that this needs to be an NTFS volume, but I have not verified this.

2) Mount the TrueCrypt volume as a drive letter, e.g. Z: Important: Windows Vista wants you to re-use this same drive letter in the future, so choose it carefully.

3) Verify that Z: was mounted correctly and you can see the files inside.

4) Create an empty folder named MyEncryptedFolder in C:\Users\MyName\ This has to be on an NTFS device or partition. This folder must be empty.

5) Open a Command Prompt window in Administrator Mode. *** Important: Click on Start, find the Command Prompt, right-click on it, select Run as Administrator. If this works properly, you should have a new Command Prompt window named Administrator: Command Prompt ***

6) In this window, type the command: mountvol.exe You should see your TrueCrypt drive letter below in the form:

\\?\Volume{0384767c-8db8-11de-b19b-00247e518e40}\
Z:\

Copy the volume ID above including the slashes into the clipboard. You will use this shortly.

7) Type the command:

mountvol.exe C:\Users\MyName\MyEncryptedFolder \\?\Volume{0384767c-8db8-11de-b19b-00247e518e40}\

(Substitute your path and volume IDs as needed).

That should be it! You should now see MyEncryptedFolder with a slightly different icon and the contents of your TrueCrypt volume inside it.

Notes:

a) If you dismount the TrueCrypt volume, and try to browse the MyEncryptedFolder, you will get a generic message that this folder “refers to a location that is unavailable”. Simply mount your TrueCrypt volume again, and everything will start working properly once more.

b) The folder mount point seems to be tied to the drive letter for some reason, so if you change the drive letter, you will have to delete and recreate the mount point. See mountvol.exe for instructions on how to do this.

I’ve started my first SourceForge project named IntelliParse. As the description goes, this is…

A library to parse user-entered form data such as telephone numbers, social security numbers, dates, etc. and intelligently convert them to usable and normalized forms, with country codes, area codes, etc.

I intend for this library to be a cross platform and available on all modern operating systems for the desktop, laptop and smartphone. I’m in the process of deciding on a directory structure, and its taking shape with the answers to this StackOverflow question:


/project //Top level folder

/bin //Binaries ready for deployment
/linux_amd64 //Linux AMD64 platform
/debug //Debug build - duplicated in all platforms
/release //Release build - duplicated in all platforms
/linux_i386 //Linux 32-bit platform
/macosx //Mac OS X
/win32 //Windows 32-bit platform
/cygwin //Windows 32-bit platform compiled with Cygwin
/vs.net //Windows 32-bit platform compiled with Visual Studio .NET
/win64 //Windows 64-bit platform

/build //Make and build files, IDE project files
/linux_amd64 //Linux AMD64 platform
/linux_i386 //Linux 32-bit platform
/macosx //Mac OS X
/win32 //Windows 32-bit platform
/win64 //Windows 64-bit platform

/config //Configuration files that accompany the binaries

/data //Data files that accompany the binaries

/doc //Documentation

/lib //External or third-party libraries
/platforms //Platform-specific code for ...
/linux_amd64 //Linux AMD64 platform
/linux_i386 //Linux 32-bit platform
/macosx //Mac OS X
/win32 //Windows 32-bit platform
/win64 //Windows 64-bit platform
/src //Available library source code in subfolders

/src //Source code tree - this will contain main.cpp
/bindings //Bindings to other languages such as ...
/python
/java
/h //Header files
/modules //Platform-independent modules, components or subprojects
/platforms //Platform-specific code for ...
/linux_amd64 //Linux AMD64 platform-specific code
/linux_i386 //Linux 32-bit platform-specific code
/macosx
/win32 //Windows 32-bit platform-specific code
/win64 //Windows 64-bit platform

/test //Automated test scripts

I am planning on using CMake and Subversion.

My C#.NET application needs to read from an Oracle database. There are many elaborate ways to connect to a database in .NET, including the Linq for Entities ORM. However, this was way too much for my purpose. I’ve found the following code to be much simpler. It’s largely copied from a C# Station post. The key difference is that you have to use the OracleClient class.

First: Make sure that your project has a reference to System.Data.OracleClient


string connectionString = @"
SERVER=(DESCRIPTION=(ADDRESS=(PROTOCOL=TCP
(HOST=OracleHost)(PORT=OraclePort))
(CONNECT_DATA=(SERVICE_NAME=OracleServiceName)))
;uid=UserID;pwd=Password;";

OracleConnection conn = new
OracleConnection(connectionString);

OracleDataReader rdr = null;

try
{
// 2. Open the connection
conn.Open();

// 3. Pass the connection to a command object
OracleCommand cmd = new OracleCommand(
"select * from mytable", conn);

//
// 4. Use the connection
//

// get query results
rdr = cmd.ExecuteReader();

// print each record
while (rdr.Read())
{
for ( int i = 0;
i Console.WriteLine(rdr[i]);
// Print each field
}

}
catch
{
throw;
}
finally
{
// close the reader
if (rdr != null)
{
rdr.Close();
}

// 5. Close the connection
if (conn != null)
{
conn.Close();
}
} // End of try-catch-finally

Thanks are also due to ConnectionStrings.com